Basics
The purpose of this library is to use the Pandas DataFrame as an interface to represent the layout of a table that needs to be rendered to an xlsx file or as an html table. The library abstracts away the tedious work of working at the cell level of an xlsx sheet or a html table. It provides a call-back mechanism by which the user is able to provide values that need to be rendered and also the styling that needs to be used for each cell in the rendered table. The library is also capable of laying out multiple tables in the same sheet which are evenly spaced vertically or horizontally based on the layout configuration provided.
Sample Data
During the later part of this documentation, we will use the sample data from the Social Security Administration which contains the U.S. child birth name records. We choose this sample data for two reasons. We reuse some of the discussion that are outlined by Wes McKinnery’s Python For Data Analysis, 2nd Edition(2017). The same data is also used in the documentation of another library function-pipe <http://function-pipe.readthedocs.io/en/latest/index.html> that the Investment Systems Group has open-sourced.
https://www.ssa.gov/oact/babynames/names.zip
Further more, we will assume that a flattened file from all the smaller files in the .zip file is available after we invoke the following function.
Please refer to the XLSX Examples section for code that loads this data.
A Hello World Example: Dataframe to Xlsx
Every use of this library involves four steps.
- We build a dataframe that resembles the shape of the table that will be rendered.
- The dataframe is passed as an argument to the function called
build_presentation_model. This function accepts a dataframe and also a number of functions as arguments. We call the value returned by this function, the presentation_model. - Create a layout of multiple presentation models (if we want more than one table rendered in same xlsx sheet or same html page)
- Call the render_xlsx or render_html functions on the respective writers. For xlsx files either OpenPyxlCompositor(uses openpyxl library) or XlsxWriterCompositor(uses xlsxwriter library). For HTML use the HTMLWriter.
A Quick Look at a Xlsx example
We will start with a simple dataframe and render the dataframe as-is to a xlsx file
import pandas as pd
from table_compositor.table_compositor import build_presentation_model
from table_compositior.xlsx_writer import OpenPyxlCompositor
# Note: use XlsxWriterCompositor to use xlsxwriter library

sample_df = pd.DataFrame(dict(a=[10, 20, 30, 40, 50], b=[0.1, 0.9,0.2, 0.6,0.3]), index=[1,2,3,4,5])

# create a presentation model
# defaults to engine='openpyxl'. Needs to be set to 'xlsxwriter' to use `xlsxwriter` library instead.
presentation_model = build_presentation_model(df=sample_df)

# create a layout, which is usually a nested list of presentation models
layout = [presentation_model]

# render to xlsx
output_fp = '/tmp/example1.xlsx'
OpenPyxlCompositor.to_xlsx(layout, output_fp=output_fp)
Running this code produces the following output:
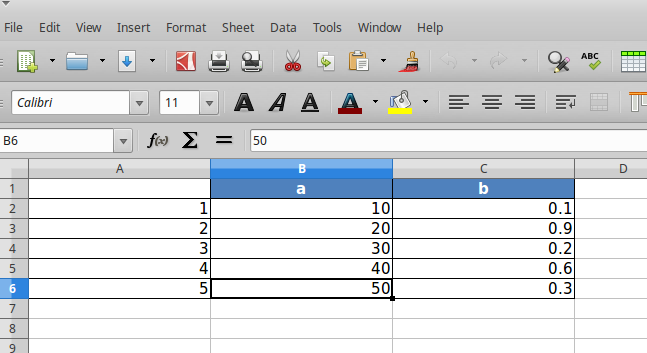
In the above code snippet, we first created a dataframe called sample_df.
To render this dataframe, we first invoke build_presentation_model. The build_presentation_model accepts the dataframe as its first argument. In this example, we use the defaults provided by this method for all other arguments. The build_presentation_model returns an presentation_model object.
Before we call OpenPyxlCompositor.to_xlsx we create a layout. A layout is a nested list of presentation_models. In our case, since we have only one presentation_model we create a list with a single element. Later on when we work with multiple presentation models that need to be rendered on to the same sheet, we could create nested list such as [[model1, model2], [model3]] etc.
Building the Presentation Model
The build_presentation_model function is the most important interface in this library. This function exposes all the functionality that is required to render beautiful looking excel worksheets or html tables.
We will now build up on our previous example and add styling to the report we generate. Before, we do that lets take a quick look at the signature of build_presentation__model.
-
table_compositor.table_compositor.build_presentation_model(*, df, output_format='xlsx', data_value_func=None, column_style_func=None, data_style_func=None, header_style_func=None, header_value_func=None, index_style_func=None, index_value_func=None, index_name_func=None, index_name_style_func=None, engine='openpyxl', **kwargs)[source]¶ Construct and return the presentation model that will be used while rendering to html/xlsx formats. The returned object has all the information required to render the tables in the requested format. The details of the object is transparent to the caller. It is only exposed for certain advanced operations.
Parameters: - df – The dataframe representation of the table. The shape of the dataframe closely resembles the table that will be rendered in the requested format.
- output_format – ‘html’ or ‘xlsx’
- data_value_func – example: lambda idx, col: df.loc[idx, col], assuming df is in the closure. This can be None, if no data transformation is required to the values already present in the source df
- column_style_func – the function can substitute the data_style_func, if the same style can be applied for the whole column. This argument should be prefered over the data_style_func argument. Using this option provides better performance since the fewer objects will be created internally and fewer callbacks are made to this function when compared to data_style_func.This argument only applies to the data contained in the dataframe and not the cell where the headers are rendered. For fine grained control at cell level, the data_style_func argument can be used. For more information on return values of this function, refer to the documentation for data_style_func argument.
- data_style_func – used to provide style at the cell level. Example: lambda idx, col: return dict(font=Font(…)), where Font is the openpyxl object and font is the attr available in the cell instance of openpyxl. For xlsx, the keys in the dict are the attrs of the cell object in openpyxl and the values correspond to the value of that attribute. Example are found in xlsx_styles module. For html, the key-value pairs are any values that go into to the style attribute of a td, th cell in html. Examples are found in html_styles module. example: dict(background-color=’#F8F8F8’). When performance becomes an issue, and cell level control is not needed, it is recommended to use the column_style_func argument rathat than this argument. If the prefered engine is XlswWriter, then the style dictionary returned should have key/values compatible with the Format object declarted in the XlsxWriter library. A reference can be found in ``xlsx_styles.XlsxWriterStyleHelper` class
- header_value_func – func that takes a object of type IndexNode. The IndexNode contains the attributes that refer to the header being rendered. The returned value from this function is displayed in place of the header in the dataframe at the location. The two properties available on the IndexNode object are value and key. The key is useful to identify the exact index and level in context while working with multi-hierarchical columns.
- header_style_func – func that takes a object of type IndexNode. The return value of this function is similar to data_style_func.
- index_value_func – func that takes a object of type IndexNode. The IndexNode contains the attributes that refer to the index being rendered. The returned value from this function is displayed in place of the index in the dataframe at the location.
- index_style_func – func that takes a object of type IndexNode. The return value of this function is similar to data_style_func.
- index_name_func – func that returns a string for index name (value to be displayed on top-left corner, above the index column)
- index_name_style – the style value same as data_style_func that will be used to style the cell
- engine – required while building presentation model for xlsx. Argument ignored for HTML rendering. This argument is used to provide the default callback style functions, where the style dictionary returned by the callback functions should be compatible with the engine being used.
- kwargs –
‘hide_index’ - if True, then hide the index column, default=False
’hide_header, - if True, then hide the header, default=False
’use_convert’ - if True, do some conversions from dataframe values to values excel can understand for example np.NaN are converted to NaN strings
Returns: A presentation model, to be used to create layout and provide the layout to the html or xlsx writers.
About the callback functions provided as arguments:
Note that callback function provided as arguments to this function are provided with either a tuple of index, col arguments are some information regarding the index or headers being rendered. Therefore, a common pattern would be to capture the dataframe being rendered in a closure of this callback func before passing them as arugments.
For example:
df = pd.DataFrame(dict(a=[1, 2, 3]))
- def data_value_func():
- def _inner(idx, col):
- return df.loc[idx, col] * 10.3
return _inner
pm = build_presentation_model(df=df, data_value_func=data_value_func())
Improving on our first iteration
Now, that we got a overview of the build_presentation_mode function, lets try setting these arguments to improve the look of our reports.
Say, we have the following requirements:
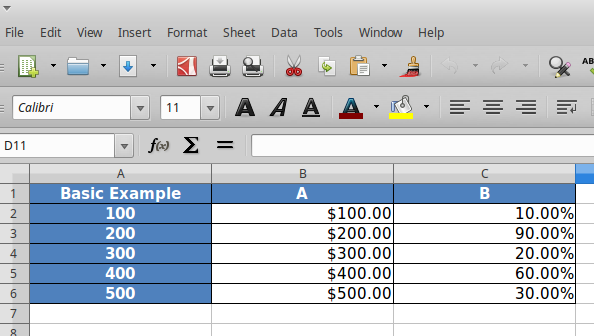
- Display column ‘A’ as in dollar format.
- Display column ‘B’ as percentage values.’
- Set back-ground color of column ‘B’ to red if value is less than 50%
- Capitalize all the column headers and add a yellow background
- Multiply all index values by 100 while rendering and add a color to the background.
- Display a ‘custom text’ on the top left corner, where pandas whole usually display the index name if available.
We update our previous example to do the following:
1 2 3 4 5 6 7 8 9 10 | import os
import tempfile
import pandas as pd
from table_compositor.table_compositor import build_presentation_model
# There are equivalent classes for using xlsxwriter library. Namely,
# XlsxWriterCompositor and XlsxWriterStyleHelper
from table_compositor.xlsx_writer import OpenPyxlCompositor
from table_compositor.xlsx_styles import OpenPyxlStyleHelper
|
1 2 3 4 5 6 7 8 9 10 11 12 13 14 15 16 17 18 19 20 21 22 23 24 25 26 27 28 29 30 31 32 | def basic_example2():
df = pd.DataFrame(dict(a=[10, 20, 30, 40, 50], b=[0.1, 0.9,0.2, 0.6,0.3]), index=[1,2,3,4,5])
def style_func(idx, col):
if col == 'b':
return OpenPyxlStyleHelper.get_style(number_format='0.00%')
else:
# for 'a' we do dollar format
return OpenPyxlStyleHelper.get_style(number_format='$#,##.00')
# create a presentation model
# note the OpenPyxlStyleHelper function available in xlsx_styles module. But a return value of style function
# can be any dict whose keys are attributes of the OpenPyxl cell object.
presentation_model = build_presentation_model(
df=df,
data_value_func=lambda idx, col: df.loc[idx, col] * 10 if col == 'a' else df.loc[idx, col],
data_style_func=style_func,
header_value_func=lambda node: node.value.capitalize(),
header_style_func=lambda _: OpenPyxlStyleHelper.default_header_style(),
index_value_func=lambda node: node.value * 100,
index_style_func=lambda _: OpenPyxlStyleHelper.default_header_style(),
index_name_func=lambda _: 'Basic Example',
index_name_style_func=lambda _: OpenPyxlStyleHelper.default_header_style())
# create a layout, which is usually a nested list of presentation models
layout = [presentation_model]
# render to xlsx
output_fp = os.path.join(tempfile.gettempdir(), 'basic_example2.xlsx')
OpenPyxlCompositor.to_xlsx(layout=layout, output_fp=output_fp)
|
On line 3 we create the dataframe.
To satisfy the requirements we listed above we pass the callback function to the build_presentation_model. Note that some helper functions are available in xlsx_style function to create styles for openpyxl. But, any other dict with keys that are attr of cell object of openpyxl should work. The above example produces the output as shown below:
Multi-hierarchical columns and indices
Rendering dataframes with multi-hierarchical columns or indices are very similar to rendering the simpler dataframes. The data_value_func and data_style_func work the same way. The functions that handle index cell rendering and column header rendering can access the IndexNode object that is passed to those functions to determine the value and level that is currently being rendered. This becomes clearer with an example.
We demonstrate this by setting a variety of colors to each cell that holds one of the values of the hierarchical columns or indices.
Note that the IndexNode argument passed to the callback function has a node.key field that unique identifies each cell with a name that is built appending the value of each item in the index or column hierarchy.
1 2 3 4 5 6 7 8 9 10 | import os
import tempfile
import pandas as pd
from table_compositor.table_compositor import build_presentation_model
# There are equivalent classes for using xlsxwriter library. Namely,
# XlsxWriterCompositor and XlsxWriterStyleHelper
from table_compositor.xlsx_writer import OpenPyxlCompositor
from table_compositor.xlsx_styles import OpenPyxlStyleHelper
|
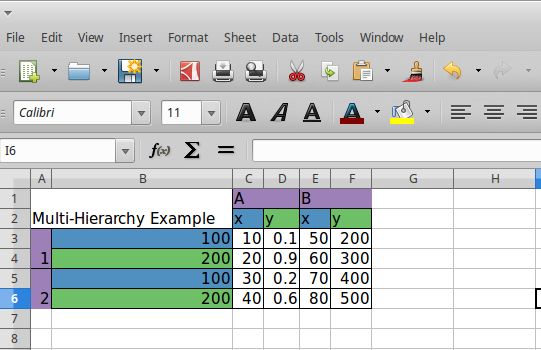
1 2 3 4 5 6 7 8 9 10 11 12 13 14 15 16 17 18 19 20 21 22 23 24 25 26 27 28 29 30 31 32 33 34 35 36 37 38 39 40 41 42 43 44 45 46 47 | def basic_example3():
df = pd.DataFrame(dict(a=[10, 20, 30, 40],
b=[0.1, 0.9,0.2, 0.6],
d=[50, 60, 70, 80],
e=[200, 300, 400, 500]))
df.columns = pd.MultiIndex.from_tuples([('A', 'x'), ('A', 'y'), ('B', 'x'), ('B', 'y')])
df.index = pd.MultiIndex.from_tuples([(1, 100), (1, 200), (2, 100), (2, 200)])
print(df)
def index_style_func(node):
# node.key here could be one of (1,), (1, 100), (2,), (2, 100), (2, 200)
bg_color = 'FFFFFF'
if node.key == (1,) or node.key == (2,):
bg_color = '9E80B8'
elif node.key[1] == 100:
bg_color = '4F90C1'
elif node.key[1] == 200:
bg_color = '6DC066'
return OpenPyxlStyleHelper.get_style(bg_color=bg_color)
def header_style_func(node):
bg_color = 'FFFFFF'
if node.key == ('A',) or node.key == ('B',):
bg_color = '9E80B8'
elif node.key[1] == 'x':
bg_color = '4F90C1'
elif node.key[1] == 'y':
bg_color = '6DC066'
return OpenPyxlStyleHelper.get_style(bg_color=bg_color)
# create a presentation model
# note the OpenPyxlStyleHeloer function available in xlsx_styles module. But a return value of style function
# can be any dict whose keys are attributes of the OpenPyxl cell object.
presentation_model = build_presentation_model(
df=df,
index_style_func=index_style_func,
header_style_func=header_style_func,
index_name_func=lambda _: 'Multi-Hierarchy Example')
# create a layout, which is usually a nested list of presentation models
layout = [presentation_model]
# render to xlsx
output_fp = os.path.join(tempfile.gettempdir(), 'basic_example3.xlsx')
OpenPyxlCompositor.to_xlsx(layout=layout, output_fp=output_fp)
|
The above function gives us the xlsx file shown below. Note the colors used to render the indices and columns and review how the two functions, namely, index_style_function and header_style_function provide the colors based on the IndexNode attributes. You will notice the use of node.key in these functions to identify each cell uniquely.