Layouts
Apart from providing styling and formatting facilities, the library also provides a powerful way to layout multiple tables on one sheet. In this section we will look at some examples.
We will use the same presentation model from basic_example2(). We will layout the presentation models with different layouts.
1 2 3 4 5 6 7 8 9 10 | import os
import tempfile
import pandas as pd
from table_compositor.table_compositor import build_presentation_model
# There are equivalent classes for using xlsxwriter library. Namely,
# XlsxWriterCompositor and XlsxWriterStyleHelper
from table_compositor.xlsx_writer import OpenPyxlCompositor
from table_compositor.xlsx_styles import OpenPyxlStyleHelper
|
1 2 3 4 5 6 7 8 9 10 11 12 13 14 15 16 17 18 19 20 21 22 23 24 25 26 27 28 29 30 31 32 33 34 35 36 37 38 39 40 41 42 43 44 45 46 47 | def layout_example1():
df = pd.DataFrame(dict(a=[10, 20, 30, 40, 50], b=[0.1, 0.9,0.2, 0.6,0.3]), index=[1,2,3,4,5])
def style_func(idx, col):
if col == 'b':
return OpenPyxlStyleHelper.get_style(number_format='0.00%')
else:
# for 'a' we do dollar format
return OpenPyxlStyleHelper.get_style(number_format='$#,##.00')
# create a presentation model
# note the OpenPyxlStyleHeloer function available in xlsx_styles module. But a return value of style function
# can be any dict whose keys are attributes of the OpenPyxl cell object.
presentation_model = build_presentation_model(
df=df,
data_value_func=lambda idx, col: df.loc[idx, col] * 10 if col == 'a' else df.loc[idx, col],
data_style_func=style_func,
header_value_func=lambda node: node.value.capitalize(),
header_style_func=lambda _: OpenPyxlStyleHelper.default_header_style(),
index_value_func=lambda node: node.value * 100,
index_style_func=lambda _: OpenPyxlStyleHelper.default_header_style(),
index_name_func=lambda _: 'Basic Example',
index_name_style_func=lambda _: OpenPyxlStyleHelper.default_header_style())
# start_layout_code_1
# create a layout, which is usually a nested list of presentation models
layout = [[presentation_model], [[presentation_model], [presentation_model]]]
# render to xlsx
output_fp = os.path.join(tempfile.gettempdir(), 'layout_vertical_example1.xlsx')
# the default value for orientation is 'vertical'
OpenPyxlCompositor.to_xlsx(layout=layout, output_fp=output_fp, orientation='vertical')
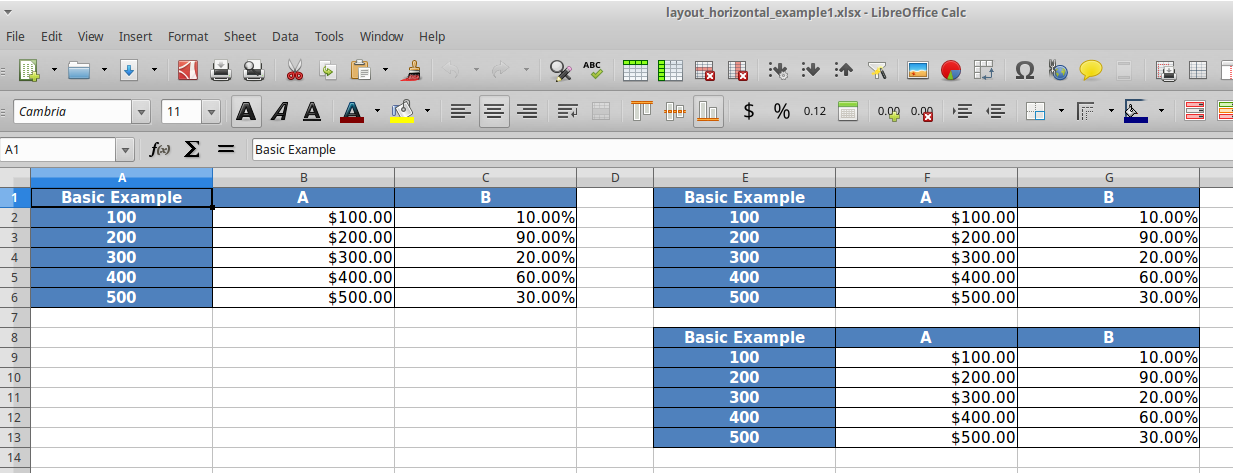
output_fp = os.path.join(tempfile.gettempdir(), 'layout_horizontal_example1.xlsx')
OpenPyxlCompositor.to_xlsx(layout=layout, output_fp=output_fp, orientation='horizontal')
print('Writing xlsx file=', output_fp)
# mutiple nesting
layout_complex = [presentation_model,
[presentation_model, [presentation_model, presentation_model]]]
output_fp = os.path.join(tempfile.gettempdir(), 'layout_complex_example1.xlsx')
OpenPyxlCompositor.to_xlsx(layout=layout_complex, output_fp=output_fp, orientation='vertical')
print('Writing xlsx file=', output_fp)
# end_layout_code_1
|
In the preceding example, we create two layouts. On line 28, we have a layout defined and then rendered to two files with different orientations.
When the orientation is vertical, then each item (presentation_model) in the list is layed out vertically. The orientation flips between vertical and horizontal for every nested listed that is encountered. In this example, you will notice that since the second item in the outer list is a list, the two presentation models in the inner list are rendered side-by-side (i.e. with horizontal orientation)

When the value of orientation argument is changed to horizontal, the renderer renders the outerlist horizontally and flips the orientation of inner lists to vertical. The second output is show below.